PINHOLE CAMERA
What is a Pinhole Camera?
Instead of using a plastic or glass lens, a pinhole cardboard camera is a box camera that holds film in place. On the front, there is a small hole, smaller than the normal aperture of a lens. Through this tiny hole light comes in and exposes the film. Because the hole is much smaller than a lens, its focus is nearly infinite yet cloudy, giving a "dreamy" effect.
|
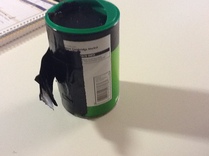
Here is a step by step guide (with images) to show how a pinhole camera is made:
You will need:
Step 1:
Make sure you have a container preferably a pringles tin, with a removable lid that is light proof (if not, cover with duct tape). Step 2: Paint the inside of the container black, make sure there are no gaps (so no light can enter). Step 3: Cut a rectangular hole half way up the container (2 cm square). Step 4: Smooth out some foil and cut a 2.5 cm square hole in the center of tine tin foil. Step 5: Attach it to the container and make sure that the pinhole is covering the original hole that you made. Step 6: Make a flap out of tape and/or cardboard that completely covers the pinhole. Step 7: Go to the darkroom (under a red safe light) and cut a piece of photographic paper that will fit inside the container (secure with tape if necessary).It should stay completely still throughout the exposure. Securely attach/replace the lid of your container and close the shutter. Step 8: Take the camera outside and place it somewhere stable with a view of an object. Open the shutter and expose the paper. Make sure that you do not move the camera during the exposure. Depending on the size of the pinhole and the brightness of the light your exposure can be anything from 30 seconds to 5 minutes. Make an educated guess and use your first image as a guide. Step 9: Close the shutter at the end of the exposure time and take the camera back to the darkroom. Carefully remove the paper and place it in the chemicals:
|


|
